Saturday 31 December 2016

Paper cutting

Happy New Year!
And what a strange year its been! If someone had told me this time last year what 2016 had in store for me I simply wouldn't have believed them. Oh well out with the old and in with the new!

Why not bring in the new year with a new craft? If you've never done it before then paper cutting can be great fun. It really does get easier the more you practice. Here's an easy design for you to try out over the bank holiday weekend.


All you need is;

  1. A piece of thin(ish) paper. I used ordinary printer paper but any scrap paper is fine
  2. A piece of thick(ish) paper or thin card. This is what your final design will be on
  3. A self healing cutting mat
  4. A scalpel
  5. A pencil


Start off by drawing your design on the thin paper in pencil.


If you like you can draw a boarder around it. This will make it easier to cut a boarder later.


Once you are happy with your design, place it face down on the white thick paper or card.

You will need to rub over the paper quite hard to transfer the design to the thick paper. Try using a coin or the back of a spoon.


This will transfer the image onto the thick paper in reverse.


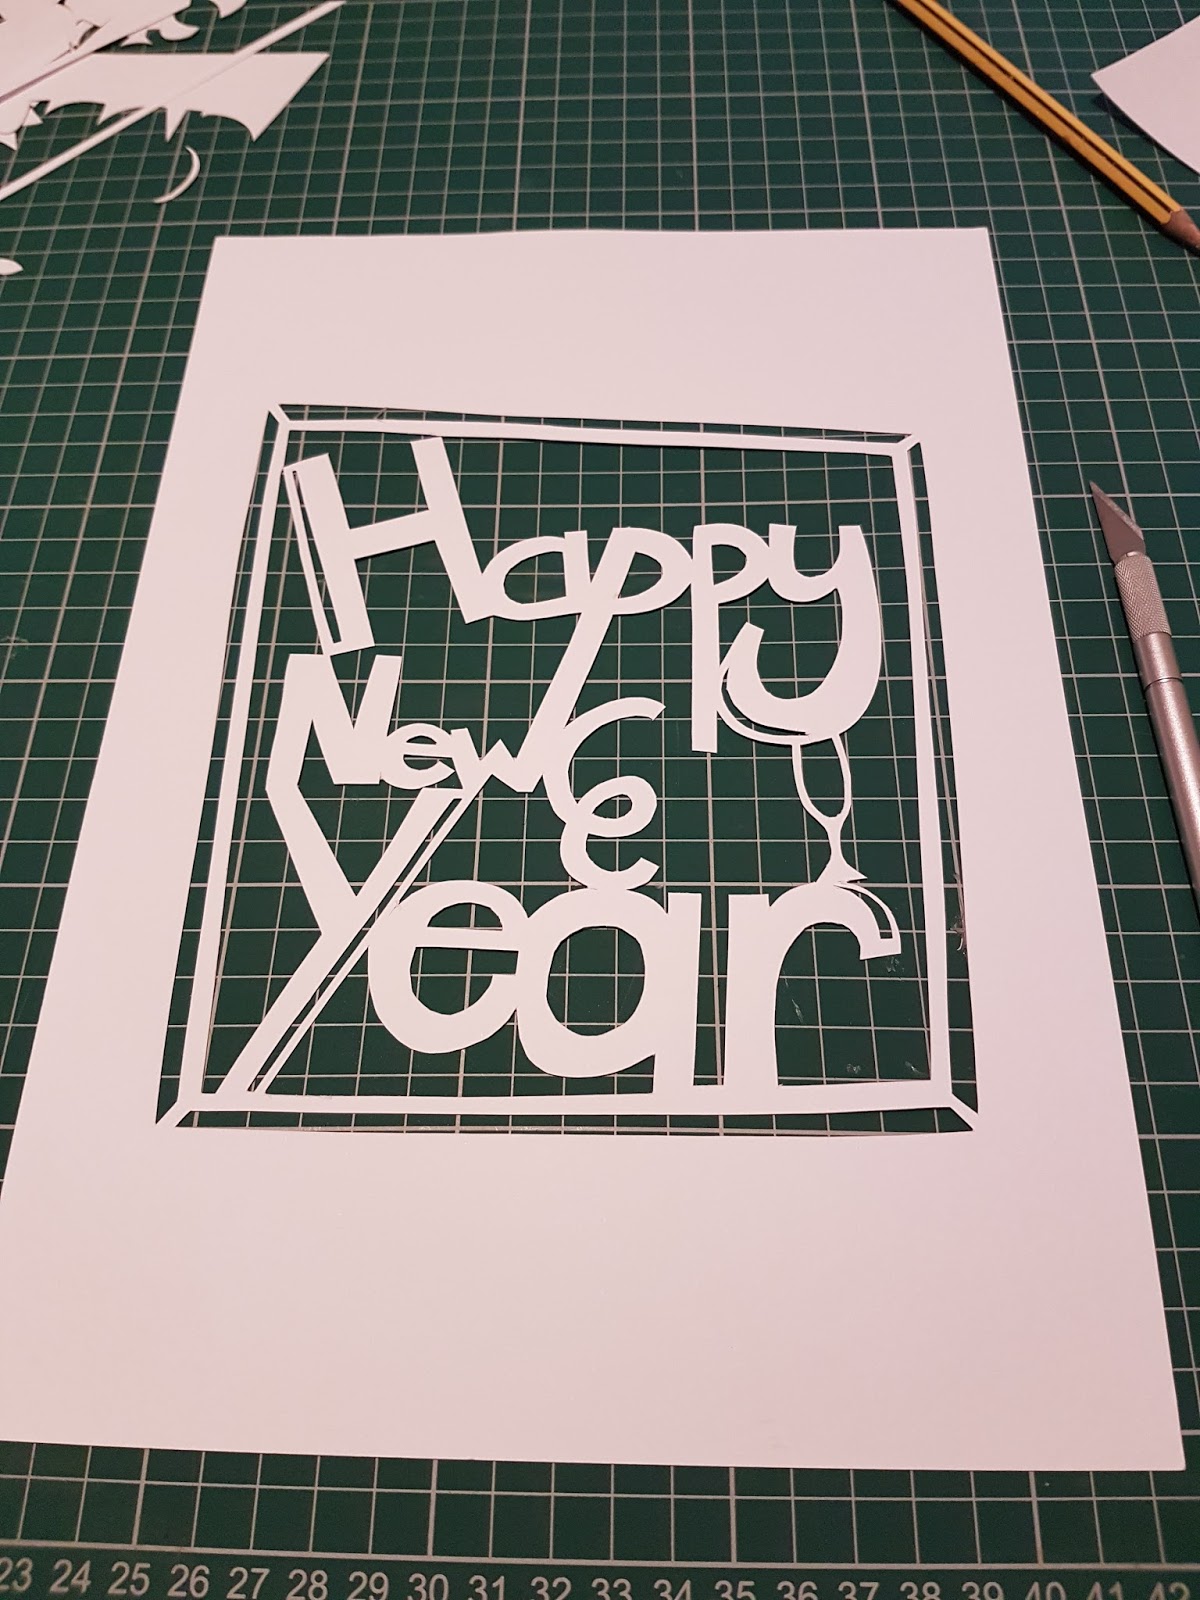
Begin with the pieces in the centre. Carefully use the scalpel to cut out the pieces between where the letters join. Be careful not to isolate any letters as these will fall out when the image is complete.


Once you have cut out all the pieces in the centre, you can cut out the inside boarder.


The more you cut away the more delicate and intricate your design will be.

Congratulations!
Now sit back and admire your paper cutting. Why not try some more detailed designs or make some personalised Birthday cards?
We would love to see what you have made. Why not share your finished work with us over on our Facebook page?


For the love of Fall.


Oh Autumn! with your crisp walks, cosy fires and tasty lattes. How we adore you so. Anyone else just love this season of mellow fruitfulness just as much as I do?


Wednesday 26 October 2016

10 of the best super geeky haloween costumes (for grownups)


Ok lets be honest, some of us just never grew out of our dressing up box did we.
One of my greatest observations about university life was that it embraced the excuse to dress up at every opportunity. Weather it be pub golf, theme nights at the SU bar or a mates birthday party, hoards of students hit the local charity shops each week to snap up the perfect piece to make their costume stand out from the rest. But alas those student days are behind me now and the only real opportunity that most of us have to get dressed up is at Halloween. But crikey, don't we make the most of it!

For many of us, myself included. Dressing up as a cat or witch has always just seemed a bit, well, lame. we're grownups now, we have all the resources and imagination in the world to make a truly amazing costume and you're seriously going to go to the party as a naughty nurse!?! Come on people we can do better than that! well at least these guys certainly can.....


http://ideas.coolest-homemade-costumes.com/2013/03/05/deceased-couple-from-beetlejuice-costumes/


Follow the link below for LOADS of costume options for wizards and muggles alike.


https://www.popsugar.co.uk/smart-living/DIY-Harry-Potter-Costumes-42446171#photo-42446171


http://imgur.com/pGYNZ6S

As a child I watched all the usual Disney classics. Only as an adult have I learnt to appreciate Studio Ghibli as a truly exceptional storytelling and visual masterpiece.


http://www.geeknative.com/44381/cosplay-meets-fashion-totoro-dress/

Like many I'm sure, I totally binged on Stranger Things over on Netflix. This costume....well its just epic.


https://scontent-mia1-1.xx.fbcdn.net/v/t1.0-9/14224862_611429302363299_5489503168210421374_n.png?oh=abbf31b5ad30cbb3d7146392e2d782ad&oe=58803D4C

Now this one looks like it may take a bit of work but boy, is it worth it!


http://www.ebay.co.uk/itm/Unique-Star-Wars-AT-ST-Walker-Cardboard-Costume-See-video-Home-made-/251545339303?pt=Adult_Fancy_Dress_UK&hash=item3a914545a7

Alien is a personal favourite childhood film of mine. Yea I know it's a bit weird but there ya go! I once made a Xenomorph costume for my little sister when she was about 7. We are that kind of family.

http://cateaclysmic.blogspot.co.uk/2015/10/5-fandom-friday-characters-i-want-to.html?utm_source=feedburner&utm_medium=feed&utm_campaign=Feed:+Cateaclysmic+(Cateaclysmic)

I may be biased but I think the 11th is the best incarnation of the modern Doctors.

http://www.nerdyfashionblog.com/post/37266792705/11th-doctor-doctor-who-budget-friendly-by

Well you have to give him top marks for originality right?


http://www.gurl.com/2015/09/22/unique-diy-food-halloween-costumes-no-one-else-will-be-ideas-for-women/#11

If group costumes are your thing then I think this is just genius!

http://www.coolest-homemade-costumes.com/animal-heads-group-costume.html


So, have you been inspired? Head over to our Facebook page and share a pic of what your going to be wearing this Halloween!


Sunday 23 October 2016

How to Make a Woodsy Tea Light Holder


There is something about the glow of candle light on chilly autumn evenings that make you feel that much cozier. Here is an incredibly simple DIY to make yourself a cinnamon wrapped tea light holder. These look fantastic on the mantelpiece in autumn or as part of a table arrangement for a wedding. They make fantastic gifts too!

You will need;

  1. Cinnamon sticks. You can get these from craft stores, online and at some health food stores.
  2. A jam jar. Try to find one that matches the length of the cinnamon sticks that you have available to you.
  3. Glue gun.
  4. Tea light.

Step 1

Measure the circumference of your jam jar and lay out your cinnamon sticks to make sure you have enough. Doing this will also make it easier to see which sticks fit best together.

 Step 2

Run a line of glue up the side of the jam jar and stick your first piece of cinnamon to it.


Continue this all the way round until you have covered the jar.


Step 3

Decorate your tea light holder however you like. Here I have wrapped it in some raffia  and added paper leaves. Learn how to make your own realistic paper leaves HERE.
why not add some holly and berries to make a Christmas themed jar? Or add some paper flowers to coordinate with a themed wedding?


How to Make Realistic Paper Leaves


For me, Autumn is all about leaves. Yes there are pumpkins, and cozy socks and bonfires but fundamentally without a beautiful backdrop of golden shades, autumn just isn't the same. This year we have been blessed in Herefordshire with fantastic fall weather. This has meant that not only are the colours stronger, but it means that we are able to be outside more to enjoy them.


I love crafting with real leaves, but sometimes this just isn't practical so paper leaves can be much more appropriate. Here is a super simple tutorial to make your paper leaves look that little bit more realistic using pigment ink pads.


These are available from Hobbycraft in a huge array of colours. The ones I have used here are the "Dark Yellow", "Dark Orange" and "Chocolate"


Step 1

You can cut out your leaf shapes however you like. What you can do is create a template by drawing around a real leaf and cut it out in card.
I love using the Tim Holtz "Tattered Leaves" die, just because it is so easy to use and I can churn out a whole bunch in no time. But it's by no means essential.


Step 2

Once you have cut out your leaf shapes, take the palest pigment pad that you have and brush it over the leaf from the centre outwards.

Repeat this process with the other pads, but as you get darker just brush the very edge of the leaf.


With your darkest pad just brush the very tips of the leaves.


Step 3

Put your leaf on a soft surface. I have used the embossing pad from my cuttlebug but you can use the back of a cork table mat or even the carpet.
Score the leaf down the centre to create "veins". I have used a crochet hook but any blunt object works fine.


 Try curling the edge of the leaves or scrunching them up a little if you want them to look a bit more dishevelled.

 Use different papers and textures for an unusual effect.


Here I have stuck them to a foam wreath base to create a lovely door hanging.


Saturday 22 October 2016

Felt Sunflower DIY


Ahhhh autumn. Season of cozy socks, bonfires, apple pie and sunflowers. Just as the days seem to get a little shorter and gloomier their cheerful faces can help but put a smile on mine. alas with the first frosts they too will fade but have no fear! Here we will show you how to make your very own felt sunflower to bloom forever.

You will need;

  1. Yellow felt. You can use two tones of yellow if you like to make the inner row of petals more interesting.
  2. Brown felt.
  3. Brown thread
  4. Card. I just used an old cereal box.
  5. Pen

Step 1

Use the card and pen to cut out 2 templates for the petals. The outer ring of petals will be slightly larger than the inner ring. The exact shape of the petals isn't too important, just this rough shape is fine.


Cut out the base and centre of the flower in brown felt. The base is 6cm and the inner 4.5cm, this will make a flower approximately 16cm in diameter.
You will need 15 Larger outer petals and 15 inner petals.
Step 2

Hold one of the outer petals and fold the wings one side over the other. It doesn't matter which way round you do it as long as they are all the same.


Sew the petal onto the base circle of felt (its the bigger one).


Sew all the petals onto the base until the circle is filled.

Repeat this process with the inner petals. Place the inner petals so that the tip just reaches the shoulder of the outer petal.


Step 3

Sew a loose running stitch back and forth over the inner circle of felt. this will give it a textured finish.
Place the inner circle over petals and sew around the edge to secure leaving a 2cm gap.
Fill the centre pocket with your offcuts of felt to make it stand out a bit, then sew the gap closed.
And there you have your own ever blooming sunflower! Try using different combinations of colour for the petals or sewing little beads over the centre to look like seeds.
I hope you like this tutorial. Please check out our Facebook page at Today, We Craft! And don't forget to like us to get updated about new tutorials.